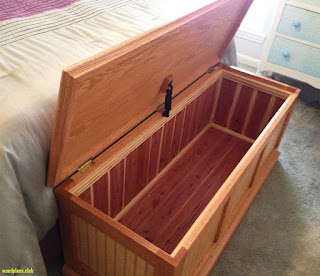
Build Your Own Exquisite Wooden Chest: A Comprehensive Guide
Crafting a beautiful, sturdy wooden chest is a rewarding woodworking project, perfect for beginners and seasoned artisans alike. This detailed guide provides step-by-step instructions, ensuring you create a piece you'll cherish for years to come. Whether you envision a rustic treasure chest or a sleek, modern design, this plan offers the flexibility to adapt to your personal style. Prepare to unleash your creativity and build something truly special!

Materials You'll Need
Before you begin, gather your materials. Accuracy here is crucial for a well-fitting chest. Measure twice, cut once! You'll need:
- Wood: Choose your preferred wood type. Hardwoods like oak, walnut, or cherry offer durability and a rich finish, while softer woods like pine are easier to work with for beginners. Calculate the amount needed based on your desired chest dimensions (see detailed dimensions below).
- Wood Glue: A high-quality wood glue is essential for strong joints.
- Wood Screws: Choose screws appropriate for your chosen wood type and thickness.
- Clamps: Several clamps of varying sizes will help secure joints while the glue dries.
- Sandpaper: Assorted grits (e.g., 80, 120, 220) for smoothing surfaces.
- Wood Finish: Select a finish that complements your wood and desired aesthetic (e.g., varnish, polyurethane, stain).
- Hinges: Choose sturdy hinges appropriate for the size and weight of your chest.
- Latch or Lock (optional): Add a secure latch or lock for extra security.
- Measuring Tape, Pencil, Saw, Chisel, Drill, Screwdriver: Basic woodworking tools.
Detailed Chest Construction
Cutting the Wood
Begin by accurately cutting your chosen wood according to the dimensions below. Remember to account for the thickness of your wood when calculating the final measurements. Precise cuts are paramount for a snug fit. Use a miter saw for clean, accurate cuts, ensuring your cuts are square and free from splintering. For intricate cuts or curves, a jigsaw may be needed. Always wear appropriate safety gear, including eye protection and a dust mask.
Assembling the Chest Sides and Bottom
Apply wood glue to the edges of the side pieces and the bottom piece. Carefully align the pieces and clamp them firmly together, ensuring that all corners are perfectly square. Allow the glue to dry completely according to the manufacturer's instructions. Once dry, reinforce the joints with wood screws, countersinking them slightly for a flush surface.
Attaching the Top and Lid
Repeat the glue and screw method to attach the top piece to the assembled box. For the lid, ensure that it fits snugly but allows for easy opening and closing. Consider adding small blocks on the inside of the top edge of the chest to allow for the lid to sit on these and prevent it from sagging over time. Again, use clamps to hold everything in place until the glue is fully set.
Installing Hinges and Hardware
Once the glue is completely dry, carefully install the hinges on the lid and the chest's top edge. Ensure they are evenly spaced and aligned. After attaching the hinges, install your chosen latch or lock. Follow the manufacturer's instructions carefully for correct installation.
Finishing Touches
Sand all surfaces thoroughly, starting with a coarser grit sandpaper and gradually moving to finer grits, to achieve a smooth finish. Clean the chest thoroughly before applying your chosen wood finish. Apply the finish in thin, even coats, allowing each coat to dry completely before applying the next. Multiple coats will enhance the protection and beauty of your chest.
Dimensions (Example - Customize to your needs!)
These are example dimensions; feel free to adjust them based on your preferences:
- Length: 24 inches
- Width: 16 inches
- Height: 12 inches
- Wood Thickness: ¾ inch
Congratulations! You've now successfully built your own exquisite wooden chest. Enjoy the satisfaction of crafting a beautiful and functional piece with your own two hands. Remember to always prioritize safety and take your time to ensure accuracy at every stage of the process.
0 comments:
Post a Comment