Build Your Dream Workshop: A DIY Modular Woodworking Table
Hey there, fellow woodworkers! Are you tired of cramped workspaces and makeshift tables that wobble more than a newborn giraffe? Do you dream of a workshop that's as adaptable and functional as you are? Then you've come to the right place! This guide will walk you through building your very own DIY modular woodworking table â€" a customizable, expandable powerhouse that will transform your workshop.
Forget those overpriced, one-size-fits-all workbench kits. This project is all about empowerment. We'll design a table that grows with your needs, adapts to different projects, and ultimately reflects your unique style. Get ready to roll up your sleeves, because we're diving into a rewarding build!

Planning Your Modular Masterpiece
Before we even think about sawing wood, we need a solid plan. This isn’t just about throwing some boards together; we’re crafting a precision instrument. So grab your favorite beverage, a notepad, and let’s brainstorm:
Defining Your Needs
First things first: what kind of woodworking do you do? Are you a master craftsman tackling intricate joinery, or a weekend warrior building birdhouses? Your answer will dictate the size, features, and overall design of your table.
Consider these questions:
- What’s the maximum size project you anticipate working on?
- What tools will you be using regularly on this table (planers, jointers, etc.)?
- Do you need built-in vises, clamping systems, or other specialized features?
- How much space do you have available in your workshop?
- What’s your budget? (Remember, modularity means you can build it in stages!)
Choosing Your Materials
Now for the fun part â€" picking your materials! The heart of your table will be the frame, and you'll want something sturdy. Hardwoods like maple, oak, or beech are excellent choices for their durability and resistance to wear and tear. For the tabletop, you could use a solid hardwood slab (gorgeous but pricey!), or go with a more budget-friendly option like plywood, MDF, or even melamine-coated particleboard (if you're careful about edge banding!).
Don't forget about your fasteners! High-quality screws, bolts, and possibly even dowels or joinery techniques will hold everything together. Consider using stainless steel or galvanized hardware for longevity.
Sketching Out Your Design
I know, I know, you're probably not an architect. But even a rough sketch will help you visualize the final product and make sure everything fits together. Consider these key elements:
- Modular Frame: Think of individual sections that can be easily connected and rearranged. A classic approach is to use a grid system of 2ft x 2ft (or metric equivalent) modules.
- Leg System: Robust legs are crucial. Consider using 4x4 posts or even metal legs for extra stability. Make them adjustable for uneven floors.
- Tabletop Supports: Strong cross-members will provide support for your tabletop and prevent sagging.
- Storage: If space is tight, think about integrating drawers, shelves, or tool hanging systems.
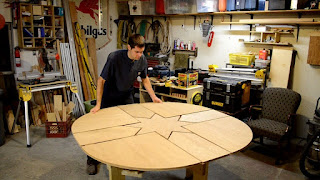
Building Your Modular Wonder
With your plan finalized, it's time to get building! This is where your woodworking skills will shine. Remember to take your time, double-check your measurements, and enjoy the process!
Constructing the Modular Frames
Begin by cutting your hardwood to the dimensions you planned for your modular frame sections. Accurate cuts are crucial here. Utilize your table saw or miter saw for precision. Assemble each frame using strong joinery such as mortise and tenon, pocket holes, or even robust butt joints reinforced with screws and wood glue.
Creating the Leg System
Your legs need to be rock-solid! Attach them to the frame sections using strong screws and possibly reinforcing plates. If you're using adjustable feet, install them now. Ensure the legs are perfectly square and plumb â€" a level is your best friend here.
Attaching the Tabletop
Once the frame is assembled, carefully attach the tabletop. You could use clamps to temporarily secure it while you predrill pilot holes and fasten it securely. Consider adding a few extra supports underneath for very large or heavy tabletops.
Adding Customizable Features
Now for the fun part: personalization! This is where your modular design truly shines. Add those features you brainstormed earlier. This could include:
- Built-in Vises: Securely mount vises to your frame using robust bolts.
- Clamping Systems: Incorporate dog holes or a track system for easy clamping.
- Tool Storage: Build drawers, shelves, or add a pegboard system for convenient tool organization.
- Power Strips: Integrate power outlets for your power tools (be mindful of safety regulations!).
Finishing Touches and Customization
After you've built your basic table, the real fun begins. You can customize and personalize your workbench to fit your specific needs and style. Consider these options:
- Finishing: Apply a protective finish like varnish, polyurethane, or oil to protect your table from spills and wear and tear.
- Customizable Top: If you used plywood or MDF for the tabletop, you can add a protective layer of epoxy resin to make it more durable or even create a beautiful river table effect.
- Add-ons: Your modular design makes it simple to add new sections later. You can always expand your table as your woodworking projects grow more complex.
Commonly Asked Questions
Q: What kind of wood should I use? A: Hardwoods like maple, oak, or beech are ideal for the frame. For the tabletop, you have options â€" solid hardwood, plywood, MDF, or melamine-coated particleboard. It depends on your budget and aesthetic preferences.
Q: How do I make it modular? A: The key is to design the frame in sections (e.g., 2ft x 2ft modules) that can be connected with strong fasteners. This allows you to easily rearrange, expand, or even reconfigure the table as needed.
Q: How much will this cost? A: That depends on the materials and features you choose. A basic table can be built relatively affordably, while adding advanced features like built-in vises or custom tool storage will naturally increase the cost.
Q: What tools will I need? A: You'll need standard woodworking tools including a saw (circular saw, miter saw, or table saw), drill, screwdriver, clamps, measuring tape, level, and potentially a router depending on your design and joinery choices.
Q: Can I build this even if I'm a beginner? A: Yes! While some woodworking experience is helpful, this project is designed to be achievable for intermediate woodworkers. Take your time, follow the instructions carefully, and don't be afraid to ask for help if you need it.
There you have it! Your journey to building a fantastic DIY modular woodworking table is just beginning. Remember, this is your project, your space, and your design. Make it your own! Happy building!


0 comments:
Post a Comment